This case study marketing project focuses on understanding audience preferences through behavioral data.
Tracking user interactions on the blog provides valuable insights into which topics interest readers the most.
Recently, I decided to monitor which article categories are the most popular by using Google Tag Manager (GTM) to capture clicks on categories.
My initial goal was to find out which categories on my blog are the most popular.
I collected the data by tracking categories using Google Tag Manager (GTM) as part of this case study marketing approach to improve content strategy based on real user behavior.
My first goals defined as follows:
- To monitor which article categories visitors click on the most.
- To gain insight into which topics generate the most traffic.
- To optimize the content strategy based on data about readers‘ interests.
Table of contents
- What Tools did we use to Track Categories?
- Implementing Custom Click Events for Blog Categories in GTM for GA4
- Challenge: Missing Category Variable
- Exploring the Data Layer
- Where I found the Data Layer in GTM?
- Step 1: Creating a Data Layer Variable in GTM
- Step 2: Create a Trigger to Track Categories
- Step 3: Create a Tag to Send Data to GA4 for Tracking Categories
- Step 4 : Test your Tags
- Results out marketing case study
- Conclusion
What Tools did we use to Track Categories?
I used two tools to track and monitor categories.
Google Tag Manager (GTM) – I used it to create tags, variables, and triggers for my blog categories.
Google Analytics 4 (GA4) – was used for collecting and analyzing visitor data and user interactions.
Implementing Custom Click Events for Blog Categories in GTM for GA4
Challenge: Missing Category Variable
However, my journey started with a challenge: I couldn’t initially find the category information I needed within the usual GTM variables or page elements.
When setting up tracking, it’s important to capture the correct data.
In the case of article categories, the goal is to obtain the category name whenever a visitor clicks on a category link.
At first, I tried to find this information directly in the DOM elements or in the basic GTM variables.
Unfortunately, I couldn’t do it, so I started looking for another approach.
Exploring the Data Layer
When the direct approach didn’t work, I turned to the Data Layer — a JavaScript object that many websites use to store useful information about the page and user interactions, which GTM can easily access.
I explored the Data Layer on my blog and discovered that the category information was there, but GTM wasn’t using it yet.
Where I found the Data Layer in GTM?
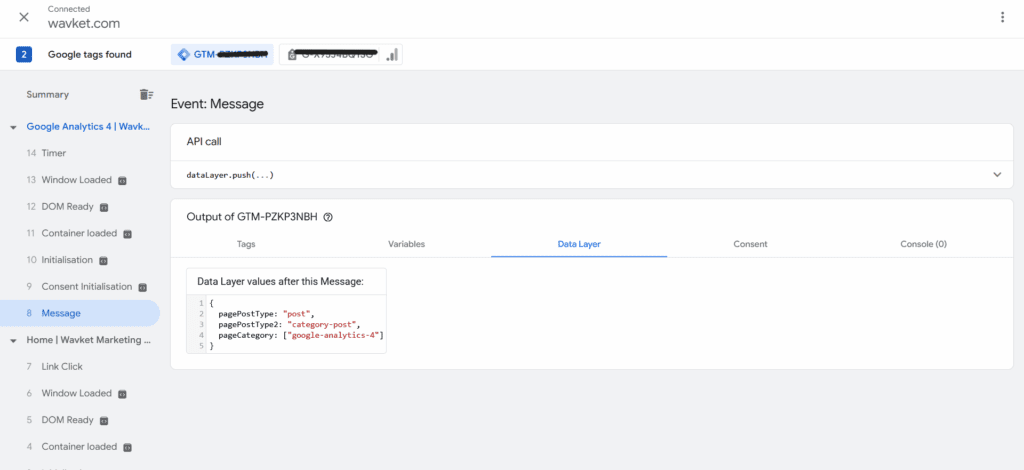
- Log in to your GTM account.
- Click on Preview to open Tag Assistant.
- Load your website and click on an article category link.
- In Tag Assistant, you’ll see a message appear on the left side — click on it, then click on the Data Layer tab.
- There, you’ll see the value for the category. In my case, it’s called pageCategory.
Creating a Data Layer Variable in GTM
I solved the problem by creating a Data Layer variable in GTM to capture the category name.
Here are the steps:
- In GTM, I went to the Variables section and clicked on New.
- I selected the variable type Data Layer Variable.
- I entered the exact key name from the Data Layer where the category was stored (for example, pageCategory).
- Give the variable a clear name (like “DLV | Article Category”) and save it.
- This ensured that GTM can dynamically retrieve the category name whenever the variable is used.
Step 2: Create a Trigger to Track Categories
My goal was to find out which categories are the most visited (i.e. most read), so it was enough to track page views and extract the category information from them.
Because I wanted to track article categories on page loads, I used an All Pages trigger (which fires on all pages).
How to Set Up an All Pages Trigger in Google Tag Manager (GTM):
- Log in to your GTM account.
- In the left menu, click on Triggers.
- Click the New button.
- Name the trigger, for example, All Pages.
- Click on Trigger Configuration.
- Select Page View.
- Choose the type: All Page Views.
- Click Save.
Step 3: Create a Tag to Send Data to GA4 for Tracking Categories
Now, we have to create a tag to send data to GA4.
- Go to Tags > New> Tag Configuration.
- Select Google Analytics: GA4 Event.
- Select your GA4 configuration or create a new one using the Measurement ID (e.g., G-XXXXXXXXXX). How to create GA4 tag for your website you can read here.
- In the „Event Name“ field, enter the name of the event you want to send to GA4 (I used the name article_view).
- In the „Event Parameters“ section, you can add
- Event parameter = category_article
- Value = {{Dlv | Article category}}
- Assign the trigger you created in step 2.
- Name the tag (e.g., Send article category) and save it.
Step 4 : Test your Tags
- Enable Preview Mode in GTM.
- Navigate through the website and click to the categorie
- Verify that:
- Your trigger fired.
- The GA4 event was sent with the parameters.
- In GA4, check the real-time reports (Reports > Realtime) to see if the event appears.
- If everything is working correctly, save it.
Results out marketing case study
After 3 weeks of monitoring, we have obtained the following data:
| Category | Number of Clicks | Share of Total |
|---|---|---|
| Google Analytics 4 | 25 | 16% |
| Google Search Console | 50 | 33% |
| Google Tag Manager | 31 | 20% |
| SEO | 20 | 13% |
| Strategy | 26 | 10% |
The most read category turned out to be “Google Search Console” with a 33% share of clicks.
These data show me that I should focus on writing about Google Search Console and Google Tag Manager.
This is also confirmed by my GSC data, which indicate the keywords my site is ranking for. I decided, that this data I using by planning a content.
Conclusion
Using GTM and GA4 has allowed me to track my readers without having to modify the code.
Thanks to this data, I can continue optimizing my website and deliver content that interests you.
After successfully deploying the category tracking tag, I decided to track how much time a reader spends on my article. But more on that in the next article.
Thank you for your time.